
Topiary General Maintenance and Care Advice
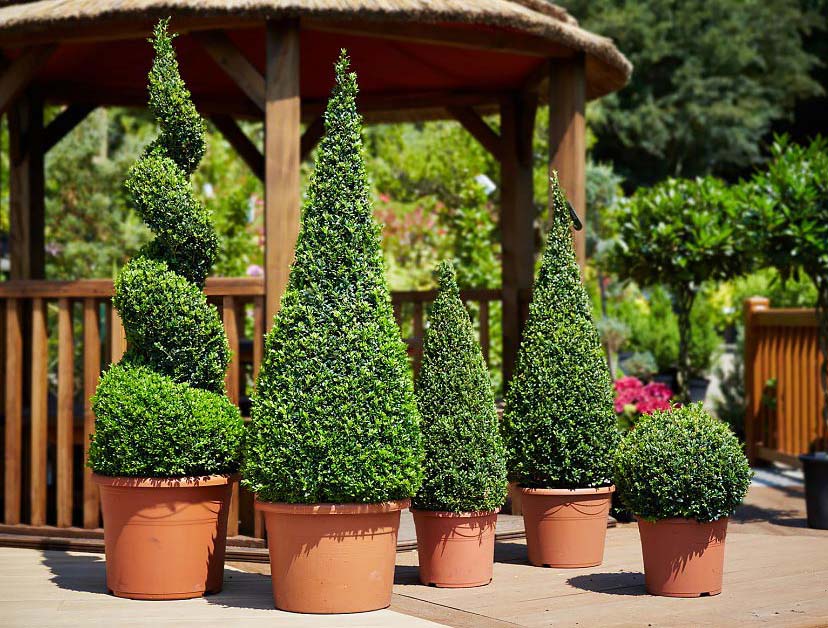
The horticultural practice of topiary is the art of training perennial plant foliage into ornamental shapes and forms ranging from spirals and cubes to animals and architecture. These living sculptures are a vibrant addition to any garden and can be used to accentuate your landscape and create a showcase of botanic art. Topiary is currently enjoying a resurgence of popularity amongst gardeners and is becoming one of the hottest trends of gardening and landscaping. Geometric shapes like cones and balls may be used to streamline landscape and highlight architecture. Whimsical creations such as horses, and squirrels will add a “wow” factor to your garden and become a conversational piece as well as fostering children’s interest in gardening. Our collection ranges from traditional varieties such as English Yew and Holly to vibrant contemporary additions like Blue Arizona Cypress.
When selecting the addition of a new topiary to your garden it is important to consider which species are best suited for your garden conditions and level of maintenance. For example, Ligustrum Jonandrum will require more frequent trimming than English Yew. Likewise, Box Faulkner will prosper in partial or full shade while Thuja requires full sunlight.
Proper selection and consideration for garden conditions will provide your new topiary with provide it with an enriching environment and in turn it will add a new aesthetic balance and character to your garden.
Topiary Planting Advice
Like all evergreens topiaries are hardy and resilient and can be planted year round providing the ground is not frozen or waterlogged. However there are some seasonal recommendations to consider. Preferably topiaries are planted in early spring or late autumn during periods consisting of cooler temperatures and moderate to consistent rainfall. After you receive your new topiary, keep the root ball watered properly until the day of planting.
Plant Spacing
- Choose a design that fits into the landscaping design of your garden and take the plant’s eventual growth into consideration.
- If planted next to a building, take eventual growth and trimming into consideration.
Ground Preparation
- Prepare an area twice the diameter of the shipping container 4-6 weeks before digging.
- Spray a non-residual weed killer on the planting area; take care not to get any unintended overspray on any surrounding vegetation.
- Generally it is recommended to lay Planting Compost 5-8cm (3-5 in) over the immediate planting area and thoroughly mix it in with the soil with a gardening fork as deep as your spade will go after removing the top layer of vegetation before planting. If needed, amend the soil with Horticultural Gravel to improve drainage.
Day of Planting
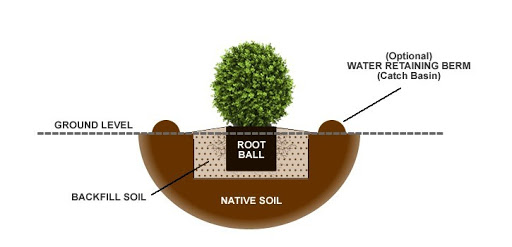
- Dig a hole twice the diameter of the pot and just as deep. Gently spike the bottom of the hole with a garden fork to encourage downward root growth, this is especially important with clay soils and will prevent the roots circling in on themselves. If drainage is an issue, dig ½ to ¼ deeper and cover the bottom of the hole with Horticultural Gravel, but make sure to cover the gravel with a layer of soil so that the roots do not directly touch it.
- Carefully remove the plant from the pot and gently unfurl and tease out the roots from the base so that they will establish in the soil. Tap the side of the pot with your hand if the root ball is being stubborn and will not remove easily.
- Place the plant in the hole in a proper upright position with top part of the root ball slightly below ground level, approximately 5 cm (2in). Take a couple of steps back during positioning and look to make sure that the plant is straight.
- After the plant is positioned properly, fill the area surrounding the hole halfway with a 50/50 mixture of native topsoil and planting compost. Fill the hole with water and allow the water to percolate down into the soil before filling in the remaining 50/50 mixture to ground level. This will allow the soil to bond with the roots and eliminate any air pockets. Then fill in the remaining soil and water fully until moist but do not waterlog.
- Once backfilling is complete, tamp down the ground with your boot and make sure that you are just firming down the ground and not pushing down the soil.
- Apply 5-8 cm (2-3 in) of mulch around the topiary’s base, but do not allow the bark to touch the base keeping a 3-5cm (1-2in) ring around the trunk as this could cause a fungal infection. Water your new topiary every other day for the first two weeks after planting and then regularly for the first 3-6 months until the roots are established.
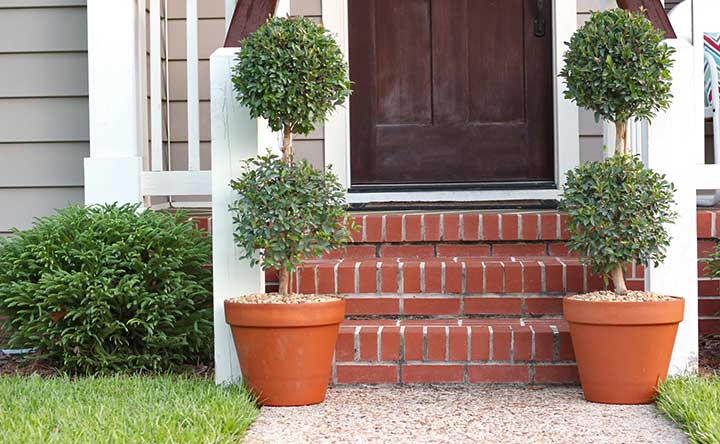
Growing a Topiary in a Container
Medium and small sized cultivars are well suited for potting and are wonderful at accentuating architecture and livening up patio space. If being planted individually, select a pot with drainage that is approximately 20% larger than the previous one to keep everything proportionate.
- Place a screen over the drainage holes and add Horticultural Gravel to the bottom of the container to improve drainage and lower the centre of gravity. Add a good layer of compost over the gravel so the rootball does not touch it. When selecting compost, ericaceous compost is essential for acid-loving plants but multi-purpose is suitable for most varieties.
- Position the plant so the rootball is 5cm (2in) from the lip and gradually add compost while firming around the sides until the top of the rootball is slightly covered.
- Water fully until water comes out of the drainages holes. Water 2-3 times per week for the first several weeks and then once per week for next 2-3 months. For further watering, place your finger 5-8cm (2-3in) deep and water if the soil feels dry. Do not overwater.
- Topdress with Mulching or Decorative Aggregate.
- While most maintenance is similar to growing plants in the ground, special attention must be paid to feeding and watering in the summer months.
Take care to provide your new topiary with an opportune planting area and it will properly establish.
Trimming and Shaping Advice
Here at Garden Plants we recommend the first yearly trimming in April-May and the second mid-September just like we do at our nursery. This will encourage growth and create denser, fuller foliage and a healthier plant. Ideally trim on a cloudy, dry day as cutting in the full sun can scorch the leaves and cutting when wet is not recommended as it can encourage blight. Your new topiary should be allowed one full growing season before a hard pruning.
- When shaping, take a couple of steps back periodically to keep focus on the topiary’s overall shape and form.
- A little and often approach will produce the best results barring the biannual trims.
- Clipping tools will range from draw-cut pruners and hand shears to electric shears depending on project size.
- Wash shears between plants to prevent the spread of disease, keep them sharp and store in a dry room to prevent rust.
After trimming, go through with your hands and gently pull out the foliage and stems, fluffing up the shape and form. With minimal but effective maintenance, your new topiary will provide a sense of personality and panache to your garden.
Topiary Watering Advice
Daily watering for the first two weeks after planting is essential so that the plant may establish its roots. For the next 3-12 weeks water every 2-3 days and after 3 months water on a weekly basis for the first growing season. Take care to water your topiary at ground level as too much sunlight can burn the foliage. For ground planted topiaries, leave the hose at the base of each plant on a slow flow for ½ hour, this will encourage deeper roots and a healthier overall specimen.
- Container based plants will require more frequent watering over the summer months since potted soil will not retain moisture as well as the ground.
- An automatic irrigation system is recommended.
In order to establish its roots properly, your new hedging will require proper watering and minimal yet regular maintenance. It will reward your efforts with lush, dense foliage and a healthy plant.
Topiary Feeding Advice
Mulching is recommended in late winter after fertiliser application to conserve moisture. Mulching also creates an insulation layer keeping the roots warmer in the winter and cooler in the summer. Remember to leave a 3-5cm (1-2in) ring between the mulch and the trunk to create a buffer zone from infection. Feed each plant 3-4 times throughout the growing season with a good slow release fertilizer, only 70g (2oz) per square meter after a rainfall so it seeps down and nourishes the roots.